Project MX Yamaha Blaster
- Updated: December 28, 2004
By Joe Tolle

Up front, our project Blaster enjoys a much wider stance thanks to Burgard Cycle’s great performing and very affordable +3 +1 A-arm package.
In Stage 1 of our Project Blaster, we made our machine faster, better handling and more durable through the use of basic bolt-on parts. We also addressed one area overlooked by many beginner level racers, — rider comfort and control. While we added quite a few mods in the first stage, most of them were relatively inexpensive and could be added individually.
After stage 1 was complete, we sat down to reevaluate our machine’s strengths and weaknesses to determine what was needed to take it to the next level. Our conclusions were unanimous; fix the suspension. With our machine’s boost in power and stability, the stock shocks felt even more harsh, packed worse, and bottomed harder then ever. Remember, all the power in the world will do you no good if you cannot get it to the ground.
Stretch and lengthen
In order to gain stability, extend wheel travel and improve durability, we decided to replace our machine’s axle, A-arms and swing arm. Starting up front, we contacted Burgard Cycle and ordered a set of +3″ wider and +1″ forward A-arms. The A-arms are made entirely of chromoly and are camber adjustable. Out back, Burgard set us up with a +2″ chromoly swing arm with round housing carrier. The trick round housing setup makes adjusting your chain very simple. You only need a couple of tools to get the job done, as opposed to the five or six different tools needed to manipulate the stock chain adjustment system. To complement the looks of the machine, we opted to have the swing arm and lower a-arms powder coated candy blue, while the upper a-arms were chromed.
At the tail of the machine, we ditched the wimpy stock axle and replaced it with a much more gnarly Dura Blue Eliminator. The Dura Blue axle is constructed of chromoly, is adjustable between +1″ and +3″ per side and features a limited lifetime warranty. If you want some extra reliability and stability, but aren’t’t ready to throw down the cash for A-arms and a swing arm, the axle can be added without effecting the leverage on your stock shocks.
Get the clunk out of your junk
 The rear end of our machine did a much better job of soaking up both large and small hits with the Works Performance Quad Star shock. The Burgard Cycle Round Housing swing arm also makes chain adjustment a snap.With the chassis components picked out, we needed to address the suspension. If you have looked at the going prices for shocks these days, you know how staggering the cost can be. Fortunately, competing in the Youth Production and 200/300 classes is more affordable than in many other classes. The average machine has less invested in it and outcome is still more determined by rider skill then by amount invested.
Works Performance is one of the longest standing names in aftermarket ATV suspension. Besides offering high dollar full out race shocks, Works is about the only company currently offering a more affordable line of custom built high performance shocks. For the front of our machine, we ordered a set of Works Performance Steeler shocks. These shocks feature dual rate springs and are preload adjustable. The dual rate setup allows a softer spring shock to soak up small bumps, while the stiffer spring helps the shock resist bottoming. We ordered our shocks without reservoirs to save some cash, but Works can later upgrade them with ressies if you like. For the rear, we ordered a Works Performance Quad Star shock. This shock is preload adjustable and features a remote reservoir.
Works shocks feature a 30-day ride guarantee in case you aren’t’t completely happy with the ride of your new suspension and since their shocks are rebuildable, they aren’t’t disposable like the Blaster’s stock shocks.
To protect our new suspension, we contacted Shock Pros and ordered a set of their black with blue flame shock covers. They are constructed of a waterproof canvas type material and close around your shocks using industrial grade Velcro. If you spend the money on new shocks, a set of these is well worth the investment.

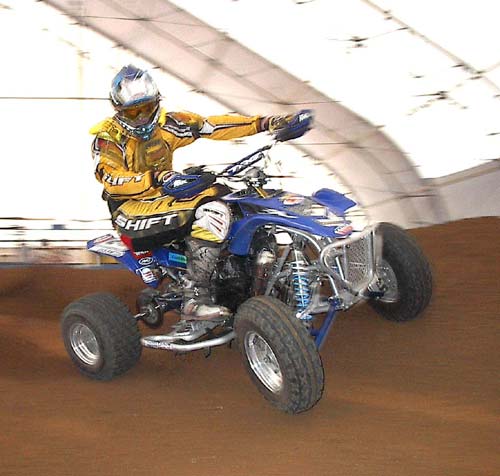
Big air with no scare! Works Performance most entry level shocks felt like they had three times the travel of the stock suspension. Whether we were pounding through the whoops or airing it out, the new shocks definitely raised our test riders’ confidence.

Project Blasters’ vented front fender kit has to be the single biggest improvement you can make to your Blaster’s appearance. If definitely got a lot of attention whenever we took our machine out for testing.
If looks could kill
After our chassis and suspension upgrades we were ready to bring the looks of our machine into the 21st century. A company called, “Project Blaster” was quick to the rescue with their vented front fender kit. Project Blaster takes a Maier Plastic one piece front end with cut out vents in the center. Their fenders allow an expanded metal grill for better cooling and improved looks. Of course, the new front fenders come with all necessary mounting hardware.
Nuts and bolts
If you race then you have to maintain your machine regularly. This often involves removing your plastic and by the time you’ve done it a few times, you may have noticed that those stock Phillips head screws strip quite easily. To ease maintenance and further improve the looks of our machine, we installed a stainless steel allen head bolt kit from GYT-WYPT Racing. They offer kits for many Yamaha models and we have used them on more then a few machines in the past.
Ride time
With the Fall comes rain, thus ending our testing at the New Vienna MX track in Ohio. Looking for some dry dirt to play in, we took our stage 2 Blaster to Earlywine’s Indoor Motocross Track, located in Northern KY. The track is a forgiving SX layout with lots of doubles, whoops, several large tabletops, and plenty of bowl turns. Not the ideal place to ride a stock Blaster, but ours was no longer stock. So how did our stage 2 Blaster perform? It exceeded our expectations!
The first thing you notice about this machine is its new appearance. While the Project Blaster graphics kit and seat cover we installed in stage 1 helped make our machine stand out, – their vented front fender kit make it look outstanding! This combined with the sweet looking blue flame, shock covers by Shock Pros and the stainless steel allen head bolt kit from GYT-WYPT Racing, had onlookers interest. The most common comments were, “What is that thing,” and “ That’s a bad looking Blaster!”
On the track we were blown away by the performance of the Works shocks, Burgard Cycle A-arms and swing arm package, and Dura Blue’s axle. These shocks and chassis components are some of the most affordable on the market, yet they completely transformed the handling of our Blaster. Money well spent if you ask us.
By the time our test riders hit the first jump the difference was clear. Instead of just soaring off the face of jumps, the Works shocks gave the machine a feeling of leaping into the air. This extra feeling of confidence was even further substantiated on the down side, or when coming up short. The suspension rarely bottomed and never did so with the same harsh clunk of the stock shocks.
The whoops would have been a bit of a handful on our stock machine. However, our test riders could choose to double, or simply plow their way through. The extra wheelbase provided by the Burgard A-arms and swing arm, combined with the vastly improved Works shocks, kept our Blaster tracking straight no matter how hard we attacked the track.

Test rider Ryan “Superman” Barns was extremely impressed with our Blaster’s new found handling. All of our test riders felt the cornering speed was greatly improved with the machine’s extra width.
 GYT-WYPT Racing’s stainless steel allen head bolt kit eliminates those stripped out phillips head screws and adds a professional looking touch to your machine.As you would imagine, the machine’s cornering ability was also improved. The Dura Blue Eliminator axle and Burgard A-arms provided our machine with an extra 6 inches of width, which aided tremendously in our machine’s cornering ability. Corners could be either railed or squared off with ease. The need for body English in turns was greatly reduced, but don’t get too lazy. These are not ZPS style shocks, so the machine does not squat way down in the suspension travel as it would with some of Works higher end shocks. However, for the money we saved, we’re willing to lean just a bit more in the turns.
The Bottom Line
The stock Blaster is an entry-level sport machine. If you want to get serious with your racing, the Blaster needs serious upgrades. Our project Blaster has been transformed into a serious racer for the intermediate level rider. We accomplished this while spending only a few hundred more dollars then some long travel A-arm/suspension packages alone!
Besides the improvement in performance, all of the components used in this stage go a long way in increasing your machines reliability. The Dura Blue axle and Burgard chassis parts are quite a bit stronger then stock and the Works shocks do an excellent job of keeping both man and machine protected from the harsh realities of a motocross track.
With all of the bolt-ons from stage 1, combined with the chassis and suspension upgrades from stage2 our Blaster is now quite a capable performer. If you want to win at the nationals though, it’s going to take a total package. The only stone left unturned is internals of the motor. Make sure you check back for stage 3 as we try and gain the necessary power to lead from holeshot to the checkered flag.

While they may be the least expensive pair of custom built shocks on the market. The Works Steeler front shocks gave us the confidence to do things we wouldn’t have considered with the Blaster’s stock front shocks.
Our Blaster’s extended wheelbase helps keep things nice and stable. Our machine is definitely ready for a serious injection of horsepower.
Holeshot Potential
At the races, we always run into dads who love bragging about the racing exploits of their children. A few nationals ago, we ran into a gentleman whose son had started racing this year. As inquisitive as we are, we couldn’t help inquiring about his machine setup. As nice as this dad was, and as enthusiastic as his son was, we couldn’t help walking away shaking our heads. His Blaster was another fine example of all motor and no handling. The motor was maxed out, the carb was huge, the pipe was blinging, and the entire chassis was nearly bone stock. These guys definitely need to read this article beginning to end and catch a clue if they hope to catch their competition.
If you remember, in Stage 1, we improved our machine’s handling , power, and appearance through the use of basic bolt on parts. In Stage 2, we further improved the look of our Blaster, and made its chassis and suspension motocross capable. With a good ergonomic and handling package in place, the time has arrived to pump some real power into our project Blaster. Read on and learn what it takes to make your motor competitive and save enough cash for next week’s racing endeavors.
Motor Madness
In 2003, Eddie Lasco took his Blaster to victory in the Youth Production class at the Loretta Lynn’s round of the GNC series. The company responsible for giving Ed the power to win was Klein’s Power Sports out of Hanoverton, Ohio. With such an impressive showing, from a relatively unknown company, we decided to send our Blaster’s engine off and see how much power Klein’s could extract from the 200cc air cooled mill.
After discussing our goals with Klein’s, we decided to go with their motocross porting package. This porting is designed for good overall power with an emphasis on additional mid to top end strength. Besides porting both the intake and exhaust ports, Klein’s milled the head for greater compression. When we asked Eric Klein if we should run race gas with this motor setup, he replied, “You should always run race gas in a Blaster since it is air cooled and race gas runs cooler.” When we got our motor back, it was fully assembled just like we sent it. Of course we were unable to visually inspect the port work before installing the motor in the frame, but the track will reveal what’s lurking inside.
In order to flow more fuel into the motor we had our stock carb bored to 28mm. While the motor can gain even more top end power by adding a larger aftermarket carburetor, boring the stocker out is a sweet deal at only $100 and works fine unless you’re holding it wide open constantly. To better regulate the air fuel mixture, we ditched the stock reed setup for a Boyesen Rad Valve. The Rad Valve mildly increases power and throttle response.
To finish our Stage 3 mods, we added a set of Project Blaster hologram air scoops. These are designed to direct more air over the motor for better cooling. They also add an extra bit of flair to the appearance of the machine.

When it came to protecting our new suspension, Shock Pros had us covered with their sweet looking Blue Flame shock covers.
Test Time
With the amount of time since we posted Stage 2, our project Blaster has gone through some testing and a few races. For our initial test, we rounded up Dale Montgomery and Tim Gruber and went back to Earlywine’s Indoor Motocross looking to compare lap times with our visit from Stage 2. Unfortunately, the track had gone through enough changes that lap time comparisons would yield no scientific results, so it’s all up to rider impression and how competitive the machine is on race day.
Once we were inside Earlywine’s, we started our machine for a quick warm up before hitting the track. As the motor warmed the crisp throttle response was immediately evident. Dropping the shifter a notch into first gear, Dale rolled calmly onto the track and began to familiarize himself with the machine’s new found power. “Out of the first turn in third gear, you immediately notice that the machine still enjoys decent low end torque,” says Dale. Roll on the gas and let the RPMs raise, or slip the clutch to rapidly bring the machine onto the pipe. Compared to our piped machine in Stage 2, our newly built motor definitely packs more of a midrange punch. While you would expect the harder hitting Klein’s motor to be more difficult to ride, their motor spreads the hit over a wider RPM range making it easier to keep the machine on the pipe. On top, things keep happening, just not as quickly as they did in the midrange. If you are at the end of a long straight next to a guy with a piped stocker, he will be grabbing another gear while you still have a few revs left to carry you into the corner.
A larger carburetor may yield a bit more power on top. For the money though, this motor’s combination of performance, readability and price make it a real contender. When your skills demand it and your budget allows it, switching carbs is as easy as calling Klein’s and purchasing their larger carburetor kit pre jetted and ready to install.
Race Day
In order to determine how competitive our Blaster is, we put it in the hands of Anthony Morgan. Anthony lives in Cleves, Ohio and won the 90cc championship at the Haspen Acres Series in 2004. While we were confident in his ability as a rider, switching machines is no easy task, especially when the one you are switching to is much larger. To make things more difficult, the 90cc production based machine Anthony raced in 2004 was fully automatic. Anthony would have to learn about manual shifting and the art of using a clutch.
After several months of getting used to the machine, Anthony showed up at Haspen in the Spring for the first round of the series. Fourteen other Blasters were on hand. They all varied in state of tune from nearly bone stock to national ready racers. We knew there would be some stiff competition for young Anthony, but that’s what we wanted to truly put our machine to the test.
What Haspen’s track lacks in technical jumping sections, it makes up for with lots of high speed turns, long straights, elevation changes and plenty of braking bumps. When the gate dropped Anthony was third heading through the first turn. As the moto progressed Anthony managed to work his way into the lead winning the first moto! Feeling confident, Anthony pulled the holeshot in the second moto. No one threatened his lead the entire race and he won again.
Throughout the rest of the season, Anthony has continued his winning ways by capturing the checkered flag at most of the races he has entered. Anthony is so confident with the machine he will be campaigning he GNC nationals in the Youth Production class for 2006. If his local racing is any indication, it looks like our project Blaster will be trophy hunting at the nationals next year.
|
Stock
|
Stage 1
|
Stage 2
|
|---|---|---|
 |
 |
 |
| In an effort to increase our machine’s straight line stability, we increased its wheelbase three inches overall. Burgard Cycle helped us achieved this with their +1″ forward A-arms and +2″ swing arm. | ||
 |
 |
 |
| To widen the rear of our machine, we installed a Dura Blue Eliminator +3″ axle. As you can see in our before and after pictures, it makes a huge difference in the machine’s stance. The Dura Blue axle is also far stronger than stock and should hold up a lot better to the rigors of motocross racing. | ||
| STAGE 1: •Graydon Proline Exhaust………$299 •DuraBlue filter….……………..$33.40 •TAG X5 Handle bars……..…$79.95 •Rox Bar Risers……………….$69.95 •Rox Dash Panel.…………….$39.95 •Rox/PowerMadd handgrds….$59.95 •Graydon Proline nerf bars……$159.99 •AC Racing front Bumper……..$107.95 •AC Racing grab bar…………$46.95 •GBC Shredder rear 18/9.5/8..$65 ea •GBC Shredder front 21/7/10..$70 ea •Douglas 190 front…………….$63 ea •Douglas 190 rear……………..$46.20 ea •Pro Design kill switch…………$34.95 •James Lucky oil inj blk off ……$29.95 •Proj Blaster graph/seat cvr…….$99STAGE 2 •Works Steelers front shocks…. $359.95 •Works Quad Star rear shock….$569.95 •Shock Pros shock covers ……..$49.95 •Burgard A-arms +3+1………….. $450 with custom powder/chrome ……$625 •Burgard swingarm +2……..…..$675 with powder/chrome……………… $699 •DuraBlue Eliminator Axle………$405.9 •GYT-WYPT fender bolt kit …….$23 •Proj Blaster vented frnt fndr kit….$160 |
CONTACTS: •AC Racing (714) 808-8330 •Douglas Wheel ( 760) 758-5560 •Graydon Proline (562) 925-4211 •GBC (310) 669-2626 •James Lucky (800) 233-2637 •Pro Design (714) 534-0620 •Rox Speed FX (218) 326-1794 •TAG Metals (619) 299-6255 •Project Blaster (304) 737-2411 •Works Performance (818) 701-1010 •Burgard Cycle (717) 225-6234 •Dura Blue (949) 770-5533 •GYT-WYPT Racing •Shock Pros (519) 971-0084 |
In Closing
We did it! By starting with basic bolt-ons, adding the suspension and chassis mods and finishing by building the motor we built a machine that went from bone stock to race winner. If we could go back and add anything, we would add hydraulic disc brakes. Of course, that is if you don’t have one of the newer models that come with them stock.
We selected each contributing aftermarket parts based upon price. After all, our goal right from the start with Project Blaster was to build a competitive machine without spending a fortune. All of the contributing aftermarket products turned out to be as good if not better than advertised. Results don’t lie. Hopefully we’ve helped you make Yamaha’s Blaster more worthy for the track.
Anonymous
March 18, 2010 at 4:11 pm
thats a well nice blaster. i got one last year but not allowed to race :(
Anonymous
November 25, 2010 at 12:04 pm
thats a nice blaster! mine has a gforce +5 axel full factory 7 pipe fliped the front rims that gave me 4 ins in the front it got me 3ed place in a hare scramble im hopeing it will look like urs soon! :D