Project Pro Caliber YFZ450R
- Updated: September 26, 2009

By Nic Granlud
Photos by Nic Granlund and Ray Gauger
First Things First
 You can take your new YFZ450R from the dealer to the motocross track, apply some numbers to its shiny new fenders and race it competitively in just about all of today’s available classes. Yamaha’s new 450R is indeed that good the way it comes in stock form.
If you want an edge on the competition however, (or you simply want to roost your buddies) you’ll want to make a few changes. And if you want the absolute ultimate race quad that’s on par if not better than what’s under some of the top-named professional riders, we’ve got the lowdown for you in this multi phase project.
Nic Granlund has raced ATVs professionally for nearly 20 years! In this time he’s built quite a name for himself and has a better grasp on what it takes to run up front in the Pro ranks than most people in this industry. Those that have seen Nic’s equipment over the years can attest, he doesn’t go to the line lacking anything. What’s more, Nic has elected to race Yamaha brand ATVs for the last eight years, his YFZ racing knowledge is almost unparalleled!
Nic and the aftermarket companies involved in this build have promised to provide any and all secrets and tips along the way. In other words, if you’ve often wondered what’s done special for a Pro rider’s quad that might not be available for the average rider you’re about to find out. Nic has promised to hide nothing and is eager to reveal many secrets that make a great race quad even better.
For the first phase of this project we’re keeping a strict budget. We asked Nic to carefully spend the first $1500. These first few items are the must haves in Nic’s opinion. They’re also his first choice mods. So on to the first phase we go in Nic’s own words.…
 Flexx Bars
Not that the stock bars are junk, they’re actually quite good, but for me the first thing I do to set up a quad is bolt on a set of Flexx bars from Fasst Company. At $349 they’re not cheap, but one ride and I think you’ll agree they’re worth the money, especially if you’re serious about winning races. They soak up all the small bumps and soften the big hits like no other bars. The Flexx bars allow me to charge longer and harder, so I feel I have an advantage over rider’s who aren’t running Flexx bars. I use the red inserts but you should try each and come up with what’s best for your riding style. fasstco.com
 CT Racing Sonic Exhaust System
If the stock YFZ didn’t perform as good as it does, this exhaust system would probably be the first thing on my list of modifications. As impressed as I was with the amount of power the stocker puts out, I still feel the stock exhaust is limiting. The CT Racing Sonic full exhaust system allows the YFZ to run to its full potential. It’s $508, but money well spent if you want to win races. It’s CT’s best exhaust, the head and mid pipe are stainless steel while the can is aluminum. The CT pipe makes 46 horsepower and really wakes up the YFZ engine. It pulls hard down low yet offers an amazing top-end as well. You can buy a programmer to tune the injection to the new less restrictive exhaust, but to tell the truth, it runs great without doing anything but bolting it on. We’ll tinker with a programmer more in the next phase of this project and report back with the best solution available. The Sonic system comes with a disc system so you can tune the power and noise to your needs. As for me I don’t run the discs in closed circuit racing, but would wherever noise was an issue. We installed the exhaust in less than 15 minutes without any issues. ctracing.com
 GYTR Frame Glide Plate
As far as I’m concerned there’s too much to risk not to properly protect the underside of an ATV, especially if you want to avoid DNFs and costly repairs. With that said, I think a GYTR skid plate definitely belongs on my short list of must haves and in this first phase of upgrades. It’s made of polyurethane plastic, which is much lighter than standard aluminum skid plates but protects just as well. It retails for $114.95, but like I said, this is cheap insurance since it protects the engine, frame and chassis components. The GYTR Glide Plate is named perfectly, as it really does allow you to glide over obstacles that might have slowed you down otherwise. It’s also worth noting that since it’s plastic there’s no need to peel and stick foam to the underside of your frame. It is a great product and installed with no problems whatsoever. yamaha-motor.com/sport/gytr.aspx
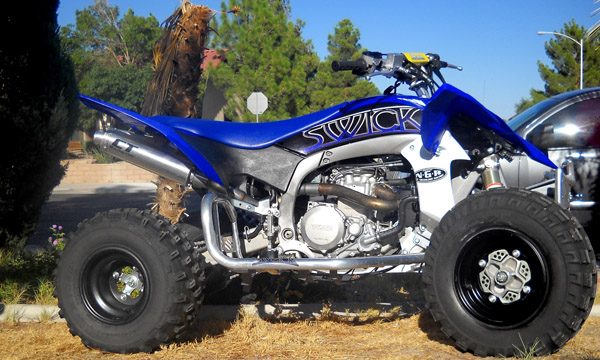
 SWICK Nerfs and Bumper
I’ve personally designed a few products for Sheppard Customs’ new SWICK line of aluminum bolt ons. So, of course I’ll be running these new goodies on this quad. We’ve installed a set of SWICK Series Nerf Bars, which retail for $349. I’ve personally designed these bad boys, and I honestly feel they’re the ultimate nerf bar available. They offer the first 4-way adjustable footpeg, they offer plenty of room for the rider’s boots, they’re extremely light weight, there are no aluminum tabs on the cross tube, which prevents smashing and ripping the nets and their minimum surface areas eliminate mud build up. They also come with easy to install instructions, logos and are pre netted.
The SWICK front bumper retails for $114. The one seen here is more of a statement piece while we work on a more light weight motocross bumper. In case you’re wondering what SWICK stands for, it’s a cross between sweet and sick. sheppardcustoms.com

Other Phase 1 Notables
The only other change at this point is an oil change. The machine now uses Torco 10/40 T4M. It’s a high quality synthetic oil that I’ve been running for a while now. www.torco-oil.com
Phase 1 in Summary
I think we’ve done well in this first phase of the project. My race quad now adds more rider comfort, which allows for longer rides and less fatigue. We’ve also added more power to an already strong engine. More grunt is always nice to have for easily clearing doubles and keeping distance between you and the competition. Lastly in this first stage of modification we have protected the underside of the machine. This was all done for $1434.95 keeping us under our budget of $1500.

When I rode the Yamaha YFZ450R in stock form and found it to exceed my expectations, and now with these first few modifications I now have a machine that out-rides, out-powers and it now offers more undercarriage protection than stock. All in all a great start to building a pro caliber ATV that’s competitive with anything you’ll see behind a 2010 pro motocross starting gate
In the second phase of this project I’ll add more aftermarket products from companies like Lonestar, Hinson, Fox Shox, Quad Tech, Maxxis, DWT, Precision, Velocity and more great products from GYTR. I’ll also make notes of every little tip and secret as the build continues, so check back as we continue with this project.

Anonymous
February 23, 2010 at 6:44 pm
Nice Quad, looks good, but whats with the low quality exhaust?
Anonymous
May 27, 2010 at 6:11 pm
CT? Low quality. Allen builds Baja winning quads every year. You need to take a closer look at CT Racing before you call something low quality.