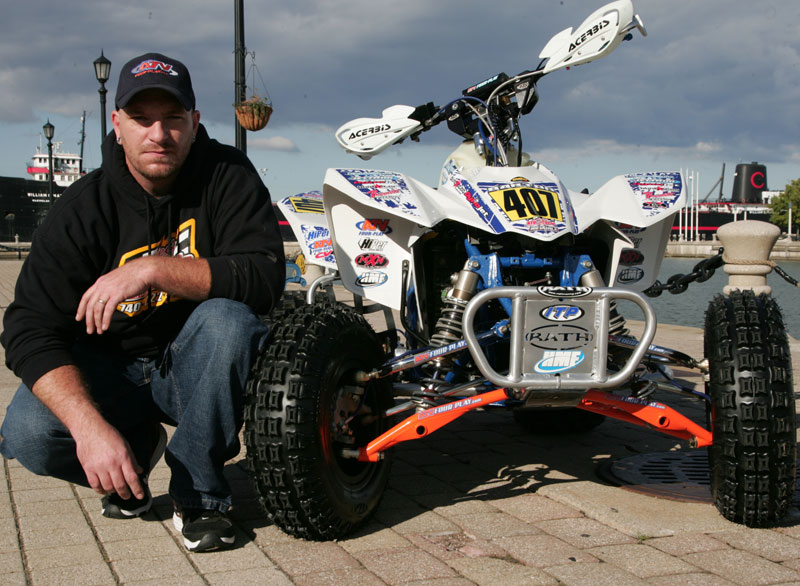
One Bad to the Bone Suzuki LTR 450
- Updated: November 29, 2010
By Dave Barton
 I chose this particular quad to build for a few reasons. Besides loving the look and roomy ride that the Suzuki offers, my main sponsor Greg McNemar (Greg’s ATV and Cycle) is a wiz with Suzuki’s LTR machines from the motors to the suspension. I also got a good approval from Hans Luenger (HMF). Hans was confident that I would like the Suzuki just as much if not better than my Honda, and he was sure I would love the exhaust he had for it. Lastly Tom Skladzien (ATV Four Play) gave me the thumbs up on switching to the Suzuki. He had a set of A-arms, a stem and soft bars all ready to bolt on to the Suzuki. I have been working with these guys for a few years now not only are they great sponsors, but great friends. They are the reason I won my first class championship last year in the GNCC and continue to race today.
Some people ask why would I give up a perfectly good TRX450R, especially after winning a national championship on it, to the switch to the Suzuki? Well as I said above I didn’t go blindly into this. Greg, Hans and Tom said that I would be pleasantly surprised. Plus to be honest I was getting a little bored with my Honda and needed something different to relight the fire.
For the build I mainly relied on my sponsors but included a few other components from some new companies that I’ve have been wanting to work with. As I go over the build I will be honest and point out likes and dislikes. In other words, like my personality, I’ll say it like it is.
 Frame
Frame
I left the frame pretty much untouched except we did weld three gussets in a few spots that have been known be a little weak. With some help from a good friend Glen McConnell we took care of the frame strengthening phase within a few hours. Gussets were added to the footpeg area as well as between the lower A-arms to join the lower frame rails. This added strength is nice insurance in case of a collision with a tree.
Powder coating the frame was left to the only person who I trust and that is RH Cox from Capital Powder Coating in Suffield, OH. We went with a royal blue with what RH describes as shattered glass overlay. In the sun it pops with all kinds of color in the flake, I think it was a great choice. It’s not overwhelming but still lets you know there’s something custom going on with the quad.

 Motor
Motor
I saved some money and purchased a well-used 2007 machine so a complete tear down and inspection of the engine’s bottom end was deemed necessary. Lucky for me I had the best engine guy in the business by my side in Greg McNemar of Greg’s ATV and Cycle. Of the many engines Greg has played with the LTR is probably his favorite.
The complete dis-assembly revealed a very tired looking crankshaft, a warn cam chain, a fatigued looking cylinder, sloppy intake valves and third gear showed visible wear in the tranny. The crankshaft was rebuilt with updated OEM Suzuki parts from the 2008 LTR450. The updated connecting rod utilizes a bronze bushing in the small end to increase reliability. Third gear was replaced, as well as the shift forks. The cases were flattened on a surface plate to ensure a quality seal. The bottom end was then blueprinted and reassembled using OEM Suzuki Parts including a new cam chain and gasket set. While we were waiting on the Nikasil re-plated OEM cylinder to return from Powerseal USA, we decided to finish up the cylinder head.
 The former owner was running heavy stainless steel intake valves with OEM valve springs, which are meant for much lighter titanium valves. The result of this improper setup was severely worn valve seats from the heavy valves bouncing off the seat erratically. We replaced the intake valves with OEM titanium valves and also replaced the valve springs and valve seals. The valve seats were resurfaced with a three angle grind on the intake side and a radius cut on the exhaust side. Flow-bench testing revealed that we could improve flow with very little effort. Greg performed what he calls his mild motocross port on the cylinder head and followed that up with a final flow-bench test. He was able to gain a healthy 10% flow. Once the Re-plated cylinder arrived from the folks at Powerseal, the top end was assembled using a 13:1 CP Forged Shelf Piston. Greg installed one of their billet intake camshafts at a 107 degree lobe center for increased bottom end.
 A Barnett clutch basket with a Rekluse Pro automatic clutch finished up our engine mods. I have used Rekluse products for many years. The Rekluse clutch system is almost like cheating if you ask me. For those of you who run one you know what I mean. The Rekluse clutch system is basically a bulletproof weapon that allows you to tackle technical terrain with both hands firmly on the bars and no worries of needing to feather the clutch to get at your powerband. There’s no slip or loss of power and you can constantly put superior traction to the ground which allows you to ride harder, faster and longer. Rekluse doesn’t cut any corners either. Nothing but hi performance billet parts are used for superior durability and oil flow. Plus, if needed, you can squeeze the lever at any RPM for a full manual override. All this is great but my favorite part is the ability to quickly hop off the quad and get it unstuck without trying to find neutral. All in all the Rekluse Z-Start Pro Clutch System is an amazing revolutionary product to say the least, and so is my freshened up LTR engine. Let me tell you this baby packs a mean-mean punch!

 Fuel Management
Speaking of packing a punch… We mounted up a DynoJet Power Commander 5 system to better handle handles the fuel control duties. With full adjust-ability at all RPM ranges this well made gadget provides a great advantage over the leading fuel management units on the market. The ease of adjustment is a major plus as well. The unit has a -100 to +250% fuel change range (up from -100/+100%). Adjustment is easily done with a standard USB cable and a lap top. A fuel management unit is a must have for any serious racer especially for those that like to tinker like me.
Cooling
Cooling duties are handled by a stock radiator and a pair of CV4 silicone hoses. The CV4 hoses are constructed from pure silicone with a polyester reinforcement. They can withstand temperatures up to 420° Fahrenh
eit! Unlike the factory hoses, our silicone hoses resist ozone and UV deterioration and are more puncture resistant. With a smoother surface coolant flow is also increased. Plus, since they come in many colors, they help make the quad look custom.

Exhaust
This was a no-brainer for me. I have used HMF exhausts on every machine I have ever owned. Quality is second to none and they really let the engine do what it’s capable of. I chose to run the new Competition Series for a number of reasons. HMF put a lot of time into the R&D of their Competition Series exhaust.
There is an ever increasing demand for systems that perform without all the noise and that’s exactly what they’ve done here. Even with the largest of the three inserts installed, the Competition Series is quieter and provides more power than its well known predecessor the Performance Series.
 Shocks
If you haven’t noticed the OEM manufacturers have recently begun using very high quality stock shocks on their 450 class units right off the showroom floor. Suzuki is no exception. The LTR comes with a an impressive set of shocks, but the guys at Greg’s ATV have found ways to make the stock shocks work even better in a variety of terrains, including GNCC racing.
Greg McNemar, owner/operator of Greg’s ATV, has been causing quite a stir in the GNCC world lately by helping a bevy of XC2 Pro-Am riders get on the podium using modified stock shocks. I’m not a Pro Am rider but that doesn’t mean I can’t enjoy Pro and Pro Am worthy suspension. Last year I had fantastic results when Greg utilized the stock shocks on my Honda TRX450R so I wasn’t the least bit reluctant to run stock shocks with Greg’s tweaks again on my new Suzuki.
Greg started by getting a baseline dampening curve of the OEM shocks. This was done using their in-house Accu-Force shock dyno. Testing revealed a very stiff front shock setup, not too surprising coming from an motocross derived quad. Greg revalved the front shocks and added one of their dual rate spring kits to offer a more plush ride for the grueling 2+ hour GNCC events.
Since we would be using a Derisi Racing linkage on the rear end of my LTR, a complete revalve would be necessary on it as well. Greg revalved the rear shock and installed a single rate spring. Since the Derisi linkage adds more leverage to the rear end, a dual rate rear spring setup was not necessary in order to achieve a plush ride in the rear of the quad. All in all I can’t say enough about the shocks. They work just like a set of expensive units but don’t cost anywhere near. Greg’s complete suspension package cost $795 and includes; Dual Rate Front Shock Conversion mods, Rear Shock Revalving, a Rear Main Spring, a Rears Shock Lower Spring Retainer, a Derisi XC Linkage (with bearings) and unlimited Tech Support. And since Greg is at all the GNCCs this is a nice bonus.
 |
 |

 A-Arms
The width of the machine had to be narrowed to be able to safely compete in most cross country events. After careful consideration I went with a set of ATV Four Play MGC Series LTR XC – 1 1/16″ A-arms.
ATV Four Play’s A-arm system is 1 1/16″ shorter per side than stock yet still produces the same stock (wider) travel and maximum ground clearance. The shock mount locations are relocated making the stock or aftermarket shock perform better on the shortened arms.
As with all of ATV Four Play XC edition MGC series A arms, the front tube of the A arm is constructed with a thicker wall tube (.120) than the other tubes on the A arms. This decision was made due to the abuse that these A arms endure in most cross country events. Tom’s CAD developed pure 4130 Chromoly steel tubed A-arms are completely hand made by professional TIG welders. The arms utilize UHMW blend bushing with steel sleeves and come with heavy duty tie rods and FRAP sealed ball joints. Lastly they’re finished with a custom powder coating and look and work absolutely top shelf!
Stem
I used an ATV Four Play anti vibration steering stem. Unlike some units available ATV Four Play uses nothing but 4130 Chromoly steel that is hand crafted by professionally TIG welders The stem is a +1/2” forward and +1/2” higher than stock. All stems are chrome plated with clamp and kill switch plate included.
Steering Stabilizer
The use of a steering stabilizer is a must have in XC racing conditions. Precision is one of the more expensive stabilizers on the market, but the quality and adjustments are second to none. You have the ability to fine tune the stabilizer with both center and side adjustments. This makes it one of the best mods you can do to any quad. In my opinion a stabilizer is a must have. Try one and I think you’ll agree.
|
 |
 |
 |
 Body
Body
I prefer stock or Maier plastic to anything on the market. Maier in my opinion is the best in the business. They offer a one-year limited warranty against breakage. I used their carbon fiber white, with offers an awesome-looking finish and really stands out. For my graphics Pro Graph-X is the graphics of choice by a lot of racers including myself. Don does a outstanding job and his products always hold up for multiple seasons. An IMS overs
ized tank with quick-fill receiver replaced the stock tank. For two hour races refueling is usually a must. With the quick-fill system you can be in and out in no time. If you haven’t tried a hump-seat you really should. I did and now I prefer this to a standard seat. Jet Trim makes a awesome hump seat cover with a wide range of colors and textures. As you’ll see in the photos their work is very nice.
Axle
An RPM Dominator II is used mainly because of its durability and it’s ability to offer variable lengths for different tracks. It’s adjustable from -2″ to +1″, which is the perfect length for tight GNCC courses as well as other events we may run. I prefer the -2 setting on the axle to keep the width narrow so you can maneuver through the trees better.
Wheels
I choose to run Hiper Tech 3 Series wheels. I went with their 9×9 rear with 4-5 offset and 10×5 fronts with 4-1 offset. The Hipers are outstanding, virtually bullet proof. And I think you’ll agree they look very sharp in black.
Tires
ITP QuadCross XC 20x11x9 rears and 22x7x10 fronts are used. I have been using ITP products for over two years now and have had nothing but good luck. Tires and wheels are so important in GNCC racing. I really think you get what you pay for. In my opinion you can’t buy a better tire and wheel combo and I’m very happy with my selection.
TireBalls
Speaking of tires and wheels, in my opinion anyone who races cross country needs some sort of flat prevention to help prevent DNFs. There is nothing worse than traveling ten or more hours to a national only to have your day ruined by a flat. I chose to run Tire Balls. Tire Balls are individual cells that are made of urethane. They’re the best flat proof system money can buy. Not only are they a flat prevention system they also help with the suspension of the machine. By not running air you take the basketball effect away from the tire helping the front to turn by not hopping and the rear to soak up braking bumps by not skipping while braking. There are two version available; XC and MX. I choose to run the MX. Either will do the trick, it’s mainly rider preference. As for tire pressure I tend to run no air in the tires and 6 pounds of pressure in each Tireball. I’m here to tell you Tire Balls are one of the best investments you can make for you quad. Here is a link to how to install them courtesy of Tireballs, tireballs.com/installation.php
 |
 |
 Brakes and Lines
Steamline brake pads and lines were installed. I like the craftsmanship of Streamline products and they have held up to some of the nastiest stuff we run through. This year over 75% of our races were run in muddy conditions and the brakes never failed me. The front brake lines are two inches longer to the stem. This is nice because if you ever choose to run a longer stem there is plenty of line available. Also with this you can reroute them to make a cleaner look.
Protection
Rocks have sidelined many riders. A Blingstar rotor and rear sprocket guard is used as is a Blingstar roost guard. I love the rotor guard especially. It’s a simple design and is very well built. It is designed to protect the rotor from rock, roots and anything else that I may run through. Its made from a tough 6061 billet aluminum and mounts in place of the stock brake stay. The sprocket guard is sold as a inner and outer dual setup, I prefer the outer only for the fact that I have seen a lot of debris get into the dual setup and cause broken chains and worse yet snapped cases cause by stretched chains. The outer is also made of a 3/8″ thick 6061 billet. The rock guard helps to keep roost and mud down to a minimum on the front. A lot of GNCC racers have to tape the front ends up to help keep the mud build up off the radiator and this helps with not needing to tape up the entire front end, plus it just looks very cool.
Rath Racing nerf bars and heel guards add a nice piece if insurance against obstacles I’ve found nerf bars help in the woods in that they allow me to pivot around trees if needed. The Rath heel guards help to keep me from running over my foot if it ever slips off the peg. The Rath heel/nerf set up work well and look very sharp. The only problem we encountered with this set up was the rear fender mounts on the heel guard. We had to cut a piece of 3/16 aluminum to make a spacer in order for the mounts to line up with the mounting holes on the rear fenders. The bumper and rear grab bar are also sharp-looking Rath Racing components. Each of these bolted on and aligned perfectly without any problems.
Lastly, I know there are plenty of good chassis skid plates available but I like to make my own. I cut mine from a 1/4″ thick sheet of urethane. I like the plastic much better than aluminum because you can slide over obstacles much better.

 |
 |
 |
 |

Controls and Cables
ASV brake and clutch levers are used. I like the levers and their unbreakable design works quite well. If the quad decides to go for a tumble it’s nice to know that the levers will be there when you flip it back over to get going again. I use Streamline clutch and throttle cables, again I like the two inch over stock design like the brake lines, you can route them easier if you are running a extended stem or different bend handle bar. They are braided for durability and have that cool factor as well.
 |
Lubricants and Odds and Ends
I’ve had nothing but good luck with Shell Rotella T 15w40 oil so this is what I run. I’m not the only one that approves of this oil, Rekluse suggest it as well. The very important air filter duties are handled with a UNI foam air filter with a good soaking of Maxima Fab 1 filter oil. The plastic is kept clean and shiny with Silkolene Pro Prep. Pro Taper chain and sprockets are uses and lubed with Silkolene semi synthetic chain oil. Lastly Pro Grips and a Pro Armor kill switch are used.
Conclusion
With the addition of a few quality aftermarket components and a little tinkering with some of the stock Suzuki ones we were able to build a serious cross country race quad with no shortcomings whatsoever. The engine makes usable low and mid range cross country punch that seems effortless. The suspension components offer a surprisingly plush ride without the high price tag. And I’m happy to say my new Suzuki outhandles my Honda all while offering more room to menuever around on the machine. In my opinion it also looks sharper than my old Honda.
Other than Chris Borich’s Suzuki you don’t seem to see too many at the GNCCs. Maybe riders don’t like the wide width of the LTR, but ATV Four Play A-arms and an RPM Dominator variable width axle solved that problem for me. Some have argued that the Suzuki weighs too much, but I haven’t been able to notice the few extra pounds one bit. All in all I couldn’t possibly be happier with my new found love, and that’s coming from a guy that won a GNCC championship on a well-prepped Honda.
zerokido0o
January 19, 2011 at 7:08 pm
the LTR is a very nice bike in this pick but im not a fan of it