Kawasaki KFX400 Grass Roots Racer
- Updated: July 16, 2006
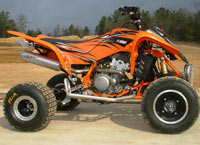


If regular visits to the motocross track are in your machine’s future, plan on either gusseting the frame before you start, or doing a lot of welding in the future. Walsh Race Craft’s gusset kit installed by Earlywine’s ATV and Cycle took care of strengthening the frame and Precision Powder Works applied the metallic looking Striker Orange Powder.
Last year we tested Kawasaki’s KFX400 and determined that it is indeed one of the most well rounded machines ever produced. The machine excels at trail riding yet it has enough suspension for light motocross and power to be fun on fast fire roads. While Team Suzuki’s Doug Gust, Jeremiah Jones and William Yokley have enjoyed success aboard highly modified versions of the KFX’s twin brother, the Suzuki Z400, the launch of Suzuki’s LTR450 stole the spotlight from the still capable 400cc Z and KFX.
While experienced racers might be better off with a 450cc machine due to their higher level of motor performance out of the box, beginner and novice level riders might be more inclined to select a tuned version of the KFX or Z. With the right chassis and suspension setup, the KFX/Z handles close to par with the 450s and its smooth broad power curve is much more manageable than its larger displacement competition. Something else to consider, riders are often slower on machines with too much power, rather than riding a machine with just enough power that they are capable of fully utilizing.
Our Goal
Our mission: build a complete race quad for the beginner to novice level rider. Along the way we’ll show how a KFX or Z owner can build the machine in stages in order to spread out the expense. As with any race quad project, we will be looking to capitalize on the machine’s strengths and improve on its weaknesses.

DuraBlue’s Eliminator Axle provided the first step in widening our KFX. Beginners thinking of trying to get by with a stock axle should think again. The axle is one of the weakest links on most sport or high performance ATVs. The DuraBlue Eliminator will survive much longer than your wimpy stock axle and if it fails, it’s covered by a limited lifetime warranty.
Stage 1: First Time Racer
The first year the KFX was introduced, the machine suffered with a few premature frame failure issues. In years since, the frame has been beefed-up by the manufacturer, making it durable enough for aggressive trail riding. Since the machine’s mild steel frame is still a bit under-built for the rigors of repeated track use, in order to bring our KFX frame up to race specs, we ordered a gusset kit from Walsh Race Craft. The kit includes various plates and extra tubing designed to add strength and rigidity to the KFX frame. While the kit comes with fewer parts than some kits we have seen, Walsh’s solution seems well thought out offering support in the frame’s most suspect areas such as the upper front shock mounts.
Before the frame was sent over to Precision Powder Works for a two stage coat of Striker Orange powder coat, we had Earlywine Motorsports install our new Walsh gusset kit. We were happy with the installation of the gussets, and the brilliant Striker Orange paint really made the frame stand out. Our very cool color choice looks flat indoors and metallic when illuminated by the sun. To protect our beefed up beautifully powder coated frame, we installed a DG Performance Baja frame skid plate.
Another issue of durability that immediately came to mind was the machine’s axle. While our test unit’s axle had survived our test sessions, we know that most OEM axles don’t last long on the track. To strengthen the rear end of our machine, we installed a DuraBlue Eliminator axle. The axle is adjustable from stock length to +2 inches per side. Its adjustability will come in handy when we set up our machine for different track conditions, and DuraBlue’s limited lifetime warranty will definitely come in handy should we ever manage to bend or break the axle.
 |
 |
|
| The transformation from stock to beginner racer feels as dramatic on the track as it looks in the pictures. | ||
 PRP’s four point chromoly subframe was the first mod we did to our KFX. While it’s not the first thing we would have chosen to replace, after bending the stock one in a mild rollover, necessity dictated this upgrade. It is light and stronger than stock. Since the stock KFX is a bit tipsy due to the stock tire’s tendency to roll in turns, the best handling improvement for the dollar is to swap out the stock wheels and tires for something more track appropriate. For wheels, we selected Douglas Wheel Ultimate wheels front and rear. Up front, we went with standard Ultimates and Ultimate BeadLocks out back. These Wheels are available in silver only, although we had ours custom powder coated, (more on that later).
At local events, tracks are often less regularly maintained than they are at the nationals, so we wanted to go with a tire combination that would excel under hard-packed conditions. Up front we decided to go old school and mounted a pair of James Lucky grooved radial tires. In the rear, we mounted up a pair of GBC Ground Buster IIs. Ground Busters, (formerly known as Shredders), feature closely spaced soft compound knobs that allow the tires to excel in hard-packed conditions. Furthermore, both the JL Radials and the Ground Busters are shorter and feature a lower profile. The machine’s overall center of gravity is lowered a bit and the new tires don’t suffer from sidewall roll-over like the stockers do.
While the KFX motor is more than a match for the 400EX in stock trim, it is a bit underpowered for racing. To get the most bang for the buck out of the KFX power plant, we recommend a freer flowing exhaust with intake mods to match. On the intake side, we ditched the KFX airbox lid and installed a White Brothers foam air filter. In order to flow more air we choose White Brothers Aluminum Pro complete exhaust system. The exhaust’s fit is precise and its appearance and construction are as appealing to the eye as the exhausts throaty thump is to the ear.
In order for your machine to be legal, your machine must have nerf bars, a kill switch, and your number displayed on the front and rear of the machine. To accomplish this, we installed a Pro Design kill switch followed by a set of DG Race Peg nerfs with built in heel guards. To mount numbers to the front and rear of our machine, we installed a DG National bumper and National grab bar. The bumper is purposely built for racing and comes complete with a number plate. What makes this bumper so cool are the built in mounts in the center of the bumper where the number plate screws into place, rather than being held on by zip ties. The bumper looks good and works well.
At this point, any further increase in performance will be accompanied by a big increase in expense. We would have definitely added a set of handlebars at this stage, but considering we are building the machine all at once, they will be added in a later stage in this article.

Along with Janssen’s Outlaw A-arms up front, we installed a +1 ¼ inch Outlaw swingarm out back. The swingarm is constructed of ovalized chromoly tubing for greater strength and rigidity and it looks very stout. All of Janssen’s chassis parts ore covered by the industry’s first lifetime warranty, impressive and very reassuring for the racer on a budget.
Stage 2: Moving Through the Pack
Having a bunch of aftermarket tricks will most likely have little effect on the results of a first time racer. However, once a rider gains experience, having a good chassis/suspension setup and more power will have a bigger impact on a rider’s results. To further enhance our KFX, we wanted to give the motor a bit more punch throughout the RPM range and give the rider a competitive suspension setup without draining our bank account.
To finish off the motor on our machine, White Brothers added a standard bore 12:1 compression Wiseco piston, and White Bros rev box. The higher compression Wiseco piston, should improve torque and horsepower numbers at all RPM levels. For improved top-end over-rev, the White Brothers rev box increases the machine’s rev limit by 1000 RPMs. We noticed ourselves hitting the rev limiter on our KFX quite often on the track, so some extra revs up top will be greatly appreciated.
For our chassis components we contacted Janssen Motorsports. Janssen was the first aftermarket manufacturer to offer an unconditional lifetime warranty on their chassis components. The warranty alone makes considering Janssen’s chassis components a no-brainer.
 |
 |
|
| Douglas Wheel’s Ultimate Wheels front and Ultimate Bead Lock Wheels rear provide optimum size and strength for racing and they look stunning with the Wet Black Powder applied by Precision Powder Works. JL Grooved Radials front and GBC Ground Buster IIs, will provide the traction necessary on Ohio’s hard packed tracks where we normally race the machine. | ||

To finish off the cockpit, we installed a PRP +1 anti vib steering stem topped with a pair of Fly Aero Tapered handlebars.
Up front we mounted a set of Janssen’s +3 inch Outlaw long travel A-arms. Why long travel? While the initial investment is a bit more for the A-arms and shocks, using longer travel shocks allows for more precise tuning of the suspension once the rider’s skill and sensitivity progress to a higher level. We plan on keeping this machine around for a few seasons, so we decided to spend more for our initial investment instead of paying to upgrade the front arms and shocks later on. The gull wing style arms are constructed of tig welded 4130 tubing and feature a large gusset plate on the underside of the shock mount for additional strength and rigidity; they look quite beefy. These race spec arms are completely caster and camber adjustable and as we would expect, they come standard with zerk fittings for easy maintenance.
One thing that sets Janssens’s Outlaw A-arms apart, is their use of heim joints. Janssen claims that their industrial size heim joints offer, a much higher load carrying capacity than standard ball joints. According to Janssen Motorsports, “Our design eliminates binding problems which can be common in some of the competition’s designs.” We will have to spend some time with them before we can develop our own opinion.
In order to handle aggressive motocross, it’s necessary to stretch out the KFX wheelbase. Janssen Motorsports recommend that we go with the industry standard +1 ¼ inch swingarm. The lengthened swingarm puts more weight over the front wheels for better manners under acceleration and flying off jumps. Their Outlaw swingarm features a round housing axle carrier setup and like the arms, they are constructed of tig welded 4130 chromoly.
While most chassis component manufacturers construct their swingarms of rectangular boxed tubing, Janssen’s Outlaw swingarm is constructed of vertically ovalized tubing. The ovalized tubing offers lots of weld surface at the carrier and where the swingarm attaches to the frame. There is also gusseting at both ends for additional strength. The inside of the swingarm features generous gusseting on either side of the swingarm’s cross brace for additional strength and torsion rigidity. The only drawback we initially noticed was that it weighed a few pounds more than the stock aluminum swingarm, but we are already aware that the benefits in strength and handling will far outweigh the few pounds our machine will gain.
 |
 |
|
| Janssen Motorsport’s long travel Outlaw A-arms combine with Stadium Suspension’s piggyback compression and rebound adjustable shocks to give our beginner level racer a pro caliber front end. Out back, our Stadium revalved rear stock shock provides greatly improved suspension action at a fraction of the cost of a full aftermarket unit. Our rear shock mod was performed by Stadiums U.S. dealer AIM Performance. | ||
 White Brothers is one of the longest standing suppliers of four stroke performance in the states. Their basic bolt on package for the KFX consisted of their Aluminum Pro exhaust, Wiseco 12:1 compression piston, White Brothers foam filter and +1000RPM rev box. The result in motor performance exceeded our expectations. With the extended A-arms and swingarm, the machine’s stock brake lines are too short to do the job. We tossed the stockers in the trash and replaced them with a set of +3 inch front and +2 inch rear Streamline steel braided brake lines. Besides being long enough to do the job, adding steel braided lines is a pretty cost effective way to enhance your machine’s braking performance. To keep our brake lines in line, we used a set of Streamlines black anodized brake line clamps.
While looking for a shock manufacturer, we came across Stadium Suspension at the Indianapolis dealer show back in February and decided to give them a try. The thing that impressed us the most was the Stadium’s range of adjustment. Turning the compression and rebound knobs from their softest to their stiffest settings made a huge difference in feel and they assured us that what we felt on their demonstration model would translate onto the machine.
Stadium makes a full line of shocks for standard and long travel applications. They can be ordered with high and low speed compression and rebound adjustments, single compression and rebound adjustment, or with no adjustment at all. We felt that a racer at any level should have the flexibility to set up his suspension, but we were concerned about overwhelming a beginner with too many options so we decided to keep things simple without sacrificing performance. For the front we ordered Stadiums 740P1 ZPL LT shocks. That translates into single compression and rebound adjustments, with a zero preload setup and long travel application. Basically it’s a top of the line race shock minus separate high and low speed compression adjustments. The shocks feature 5/8 inch shafts and come standard in a brilliant looking black and gold finish. Stadium also offers their shocks with blue or red anodizing for riders looking to really customize the look of their shocks. To give our suspension the most progressive setup possible, a quadruple rate spring setup was utilized.
 |
 |
|
| DG has stepped it up in the last few years with tons of new aluminum products geared toward ATV racing. We were very happy with their grab bar and love their national series front bumper with number plate and mounting hardware. While we liked the design of their Race Peg with Heel Guard nerf bars, the rear fender bracket sometimes snagged our test rider’s boots, and the welds on the heel guards began cracking after a short time. | ||
With so much money going into the front shocks, we decided to save some cash where we could, so instead of buying an aftermarket rear shock, we had AIM Performance, an authorized Stadium dealer here in the U.S., rebuild and revalve our rear shock to match the fronts. Making this more of a challenge for Stadium, we are continuing to use our machine’s stock linkage, considered to be less than perfect by many suspension tuners due to an inherent stiff spot it causes in the middle of the suspension stroke. Stadium’s rear shock service is quite extensive. They install a low friction seal head, dome, new piston, spring and completely change the shocks internal valving. According to Stadium, they are basically turning your stock shock into a Stadium shock from the inside out. The shock service costs a fraction of what a complete Stadium rear shock does and you still get a majority of the performance. The only thing you are giving up is some oil capacity and quality of the components that Stadium didn’t replace.

Fred Sewel of AIM Performance showed helped tune our KFX shocks. Stadiums shocks proved to be very easy to tune with their wide range of adjustment and on target spring rates and valving. Our only issue was that the rear shock was a bit stiff on small bumps. A swap out to a progressively wound rear spring rate cured the problem. We were very impressed with our first experience with Stadium Suspension.
Stage 3: Finishing Touches
Before we started this project we managed to bend our machine’s stock subframe. While we could have easily straightened it, we decided to go ahead and replace it with something stronger; so on went a PRP Racing subframe. Had we not bent our stock subframe, we would have waited until this part of our machine’s build to add the subframe, since it offers no real performance gain.
While we had the wallet open for PRP we went ahead and plopped down some more cash for a chromoly steering stem. The stem features anti-vib bar mounts and the bar clamps are available for 7/8 inch or 1 1/8 inch handlebars. Our staff prefers straighter dirt bike bends for track applications; we ordered our stem +1 inch longer since we were expecting to utilize lower bend bike bars. Both the stem and subframe were ordered raw from PRP and powder coated Wet Black by Precision Powder Works.
Atop our stem we installed a pair of Fly Racing Aero Tapered handlebars. The bars are constructed of 7075 aircraft aluminum and taper from 1 1/8 inch at the clamps to 7/8 inch at the grips. These bars also help dissipate vibration compared to normal cross bar style handlebars, helping reduce rider fatigue.
 With the extended Janssen Outlaw swingarm, our KFX flew straight and true off Echeconne’s jumps. Our ergonomic setup made the machine easy to maneuver in the air as well. Landings were the least of our concerns with Stadiums well set up shocks bolted on.From there our attention turns to turning heads. Maybe some bling won’t shave seconds off our lap times, but it’s always fun to show off. To start, we had Precision take our new Douglas Ultimate wheels and give them a healthy coating of Wet Black powder. To help our wheels stay sharp, we kept the rear bead lock ring and the rolled edge on our front wheels silver. This gave our wheels a look we have seen on aftermarket car wheels and it is the perfect setup for the dirt. The edge of the wheels is the most vulnerable to being scratched from rocks and contact with other machines. The silver edge will show scratches far less then if we had powdered them black, so they should look great the entire season. Precision hit the nail on the head for racers with this look.
To finish off our cosmetic fiasco, we added Adapt Racing’s new Tribal Graphics seat and seat cover to our orange Kawie. Comments on the kit varied from, “It looks like the Cincinnati Bengal’s quad” to the most common “That’s sick!” We even got a special invitation from Cincinnati’s Spade Creations, (Cincinnati’s version of Unique Whips) to bring our machine in for one of their drive in car shows. Spade was so stoked on the looks of our machine that they offered to install Adapt’s seat cover for us. Of course their installation was precise and wrinkle free.

With our wider, longer and lower KFX we could attack rough high speed straights much more relaxed than we could on the stock machine.

Go ahead and use the cushion. With the extra low end grunt on tap thanks to White Brothers, our KFX can easily claw its way out of the deep stuff without downshifting and excessive clutch abuse.
Riding the Great Pumpkin
On the track, our project KFX provided a real treat for riders of all skill levels. The most notable improvement over stock came in the machine’s handling. The weakest link of the KFX in stock trim is its cornering stability, mostly due to its stock tires. However, with all of our aftermarket goodies installed, the KFX is an incredible cornerer. The machine’s wider stance and lower center of gravity allow you to attack the turns much harder than you ever thought possible on the stocker. In fact, don’t be surprised if you find yourself stealing positions from 450 pilots on the inside. This KFX gets it done in the turns.
While we never thought of the stock KFX as unstable in a straight line, the lengthened swingarm paid out big dividends, allowing us to relax a bit more on fifth gear straights. We also found the machine to be much less sensitive to body positioning on jump takeoffs. Where you could send the nose up on the stock machine, the +1 ¼ inch Janssen Outlaw swingarm made the KFX fly much straighter and more predictably, similar in feeling to Yamaha’s easy to fly YFZ.
In the bumps, Stadium’s suspension quality was just shy of perfection. Up front, Stadium’s quad rate piggyback shocks worked nearly flawlessly. The shocks did a decent job of keeping our test riders sheltered from small stutter bumps. It was the whooped out Echeconne track in Macon, GA where we really witnessed our well thought out mods. The front shocks were extremely easy to tune and had an incredible wide range of adjustment on the compression and rebound clickers.
 |
 |
|
| This KFX is awesome in the turns. Whether you out brake your competition for a block pass on the inside, or keep it pinned around the outside, this machine is capable of taking whatever line you choose. | ||
 Thanks to White Brothers, our machine has more top end power and over rev which really comes in handy when ringing the motor out of turns, approaching jumps or at the end of a long straightaway – where shifting would ruin your momentum. Out back, Stadium’s reworked stock rear shock was better than stock, but it lacked the ability to utilize enough travel on small to medium sized impacts. This was especially noticeable in the whoops, where we noticed the rear end kicking up due to its lack of ability so soak up repeated small hits. No, it wasn’t packing; the single rate spring was just too stiff for anything but big hits. Fred from AIM Performance, who came to Georgia to tune for us during the test, had us send him the shock when we arrived home from testing. He installed a new progressively wound spring that allowed the shock to access more of its travel on small hits, while having plenty of bottoming resistance. With the new spring installed, the rear shock was nearly on par with their silky smooth fronts.
For our test in the Georgia sand, we missed the mark with our tire selection. Normally this machine will be raced back in Ohio where the tracks usually wind up hard packed, or at Earlywine’s Indoor Motocross, where the dirt is perfectly tacky and packed. While our JL Grooved Radials and GBC Ground Buster IIs are ideal for track conditions back home, they lack the tread spacing and depth to work properly in the loose stuff. We were able to get around the track, but our lap times would have been faster with the proper tires installed. Never the less, this tire setup will give them hell back in the buckeye state. As expected, we encountered no issues with Douglas super strong Ultimate wheels.
In the motor department, we expected that it would take some real concentration to feel the difference in where and when the White Brother’s motor mods impacted the machine’s power delivery. After all, the only internal motor change was the 12:1 Wiseco piston. Boy were we wrong! While the machine will not run with a 450 in a drag race, this basic motor package greatly improved the machine’s overall power delivery, while maintaining an extremely easy to use power delivery.
Down low, the machine pulls much harder than stock. Times that our test riders were lazily plunking up Echeconnee’s sandy hillsides, the motor would continue to pull no matter how ridiculously low the RPMs got. Stab the throttle and the harder popping motor would pull itself up in the revs. In other words a total spode could ride this thing. In the midrange, our White Brothers equipped KFX would easily wax a stocker, even though the difference felt less dramatic. This was mostly due to the fact that the stock KFX does most of its work in the middle of the RPM range. The additional top end over-rev made it easier for our testers to finish out a long straight away or clear a large jump exiting a turn without grabbing another gear. White Brothers free flowing exhaust and filter, combined with their +1000RPM rev box made a dramatic improvement. Where we constantly found ourselves hitting the KFX stock rev limiter, White Brother’s rev box gave us plenty of head room. Four Strokes require a combination of motor mods to make a noticeable improvement and for the money this setup would be hard to beat. No, you wont be beating 450s in drag races, but the power this thing delivers is substantially better than stock and far easier to deal with than the power delivery of most 450s.
When it came to stopping, the KFX has plenty of brakes. In stock condition, the KFX can stop on a dime; after installing Streamline’s extended steel braided brake lines you’ll have some change left over heading into a corner. Maybe you won’t quite have the motor of a 450, but with Streamlines brake lines, braking is pretty much on par. Just out brake your competition heading into the corners on the inside.
PRP’s +1 inch steering stem and Fly handlebars combined with DG Race Peg nerfs gave the already comfortable KFX one of the coziest cockpits we have ever sat in. The less swept back bars helped put our test riders in the attack position with elbows up automatically. DG’s Race Peg nerfs big beefy pegs give a feeling of security, but unfortunately, we did have a few issues. The brace on the nerfs that supports the rear fenders is not as out of the way as the stock rear fender brace. All of our test riders complained of their boots becoming snagged on them when they rode on the balls of their feet. The other issue we had was durability. The heel guards look good, and we like the all-in-one design, but the welds on the heel guards started cracking within an hour’s use. Within four hours, all of the welds had completely separated and our heel guards no longer had flat plates in them. We have not used these before, so we are unsure if this was a flook or just a design that needs to be beefed up.
As far as the rest of our machine’s aluminum bolt-ons goes, there’s nothing but good things to say. DG’s rear grab bar is plenty strong, their Baja skid plate is overkill for a MX machine and that’s not a complaint. What we liked best was their National front bumper. Not only is this thing built for a number plate, the plate was included, along with all necessary hardware. Besides the issues with the nerfs, we were impressed with their products and feel DG is really making a commitment to producing products that lend themselves to competitive riding.
The Bottom Line
While it’s not cheap, for the beginner level racer this thing is race ready. What’s better is that by not skimping on less expensive chassis components and shocks, combined with the fact that we took the time to beef up the frame, this machine can easily be upgraded with more horsepower, to handle tougher competition as the rider’s skills increase.
While it’s not the fastest machine we have built, it’s definitely one of the most fun to ride. Check back at the end of the summer as White Brothers gives our KFX motor the boost necessary to give 450s fits.
Happy building!
| Machine |
$5,799
|
||
| Motor Mods |
$931.10
|
||
|
Exhaust
|
White Brothers Alum Pro
|
$595.95 | |
|
Air Filter
|
White Brothers Dual Stage Foam
|
$22.95 | |
|
Piston
|
Wiseco 12.1
|
$142.20 | |
|
Rev Box
|
White Brothers Rev Box +1000rpm
|
$170 | |
| Chassis Mods |
$2,737.92
|
||
|
Frame Gusset Kit
|
$200 | ||
|
A Arms
|
Janssen Racing Outlaw Long Travel
|
$825 | |
|
Swingarm
|
Janssen Racing Outlaw Swingarm
|
$699 | |
|
Brake lines F/R
|
Streamline +3in fronts and +2in rear
|
$135.98 both | |
|
Brake Line Clamps
|
Streamline Brake Line Clamps
|
$36 | |
|
Axle Carrier
|
Janssen Racing Twin Row
|
$159 | |
|
Steering Stem
|
PRP +1
|
||
|
Sub Frame
|
PRP 4 Point
|
$429 | |
|
Axle
|
DuraBlue Eliminator
|
$425.92 | |
| Suspension Mods |
$2,029
|
||
|
Front Shocks
|
Stadium 740P1 ZPL LT quad rate piggyback shocks w/compression and rebound adjustment
|
$1,650 | |
|
Rear Shock
|
Stock revalved and resprung by Stadium
|
$379 | |
| Aluminum Bolt-Ons |
$592.80
|
||
|
Front Bumper
|
DG National Series
|
$107.95 | |
|
Grab Bar
|
DG National Series
|
$64.95 | |
|
Nerf Bars
|
DG Race Peg With Heel Guard
|
$309.95 | |
|
Chassis Skid Plate
|
Baja Series Full Chassis Skid
|
$109.95 | |
|
Tires/Wheels
|
$817.90
|
||
|
Tires Front
|
James Lucky Grooved Radial
|
$151.90 | |
|
Rear Tires
|
GBC Ground Buster II 18/9.5/8
|
$136 pair | |
|
Wheels Front
|
Douglas Ultimate
|
$212 pair | |
|
Wheels Rear
|
Douglas Ultimate Beadlocks
|
$318 pair | |
| Controls |
$80.90
|
||
|
Handlebars
|
Fly Aero Tapered
|
$69.95 | |
|
Grips
|
Scott Com II ATV
|
$10.95 | |
|
Graphics/Powder Coat
|
$630
|
||
|
Graphics/Sear Cover
|
Adapt Racing Tribal
|
$130 | |
|
Frame Powder Coat
|
Precision Powder Works, Strip +2 coat finish, Striker Orange
|
$275 | |
|
Wheel Powder coat
|
Precision Powder Works, Wet Black Powder with custom masking
|
$120 Set of 4 | |
|
Subframe Powder Coat
|
Precision Powder Works, Light Blasting for Adhesion, Wet Black Powder
|
$65 | |
|
Steering Stem Powder Coat
|
Precision Powder Works, Light Blast for Adhesion, Wet Black Powder
|
$40 | |
| Mods Total |
$7,819.62
|
||
| Total Machine Cost |
$13,618.62
|
Anonymous
September 2, 2010 at 9:06 pm
nice qaud 8)